• Posts
  • About

  • Card, Sympathy

    Vintage-Inspired Sympathy Card Using Elements of Text

    Published by

    Nicole Black

    on

    July 28, 2025
    Vintage-Inspired Sympathy Card Using Elements of Text

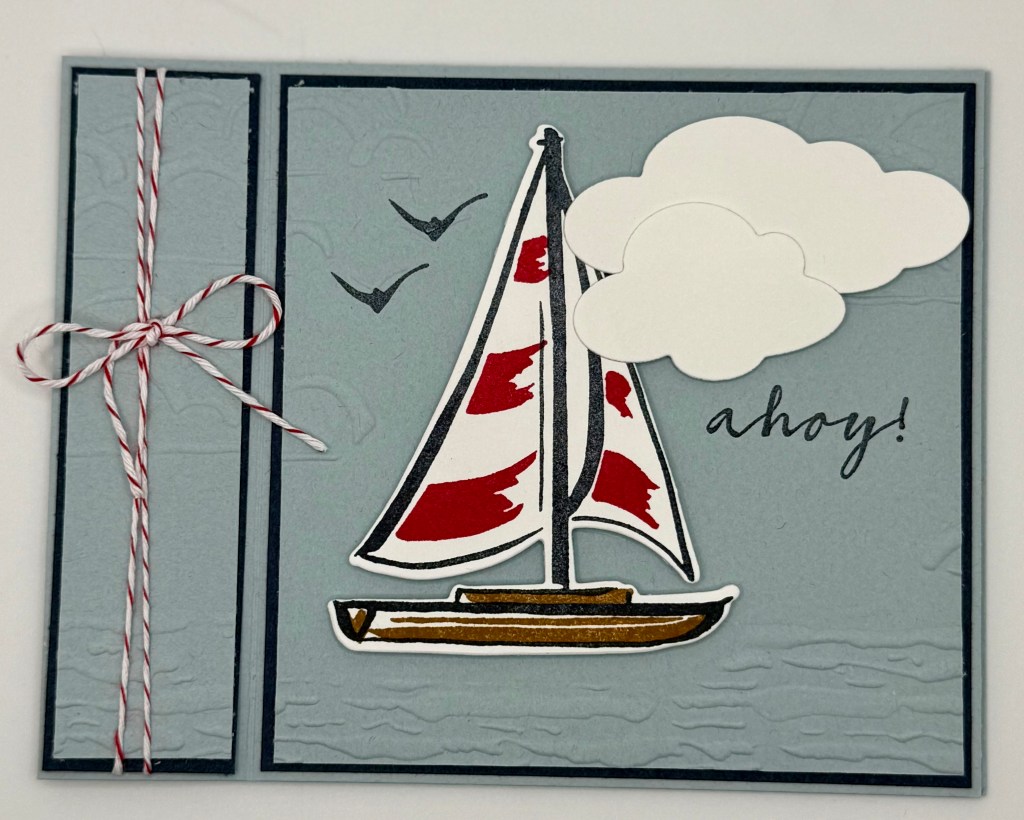
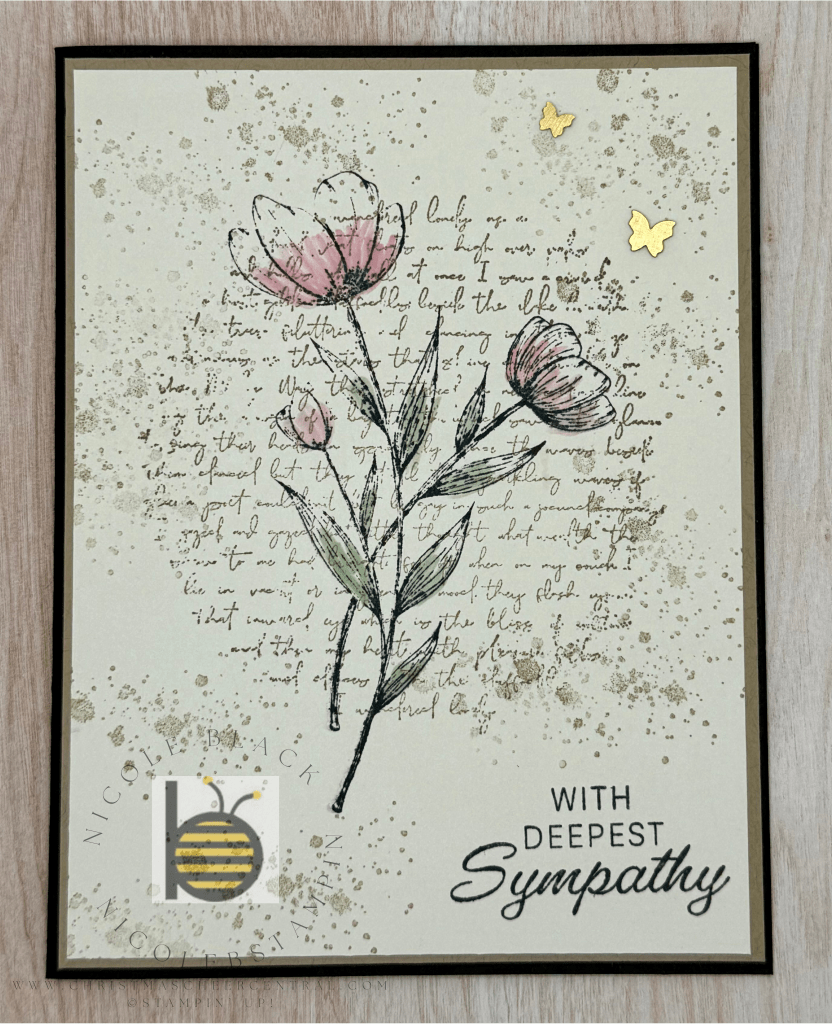
    Today I’m sharing a simple, elegant card that’s made with just a few supplies—stamps, cardstock, and a bit of soft coloring. It’s a versatile design that works beautifully for many occasions, but I especially love it as a Sympathy card. Its gentle colors and vintage touches give it a peaceful, heartfelt tone.

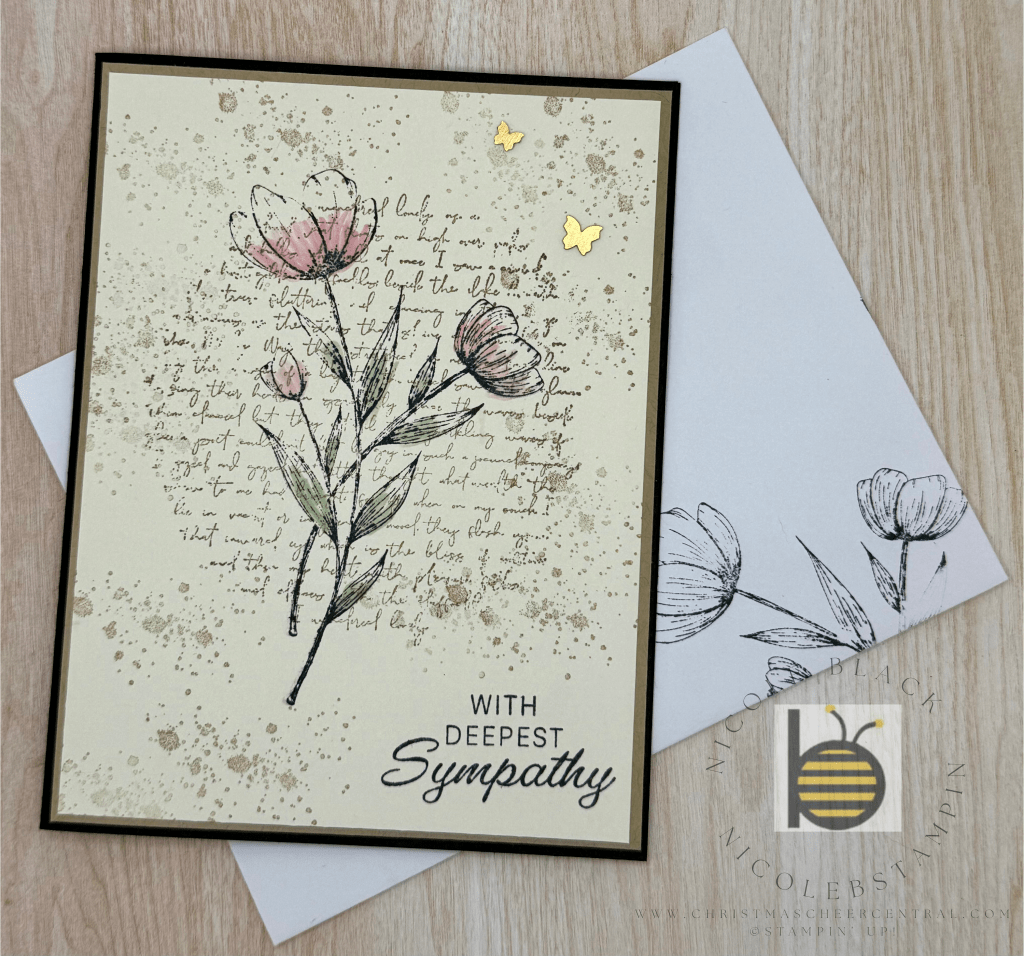
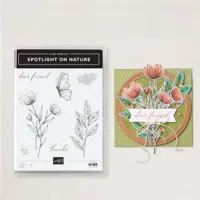
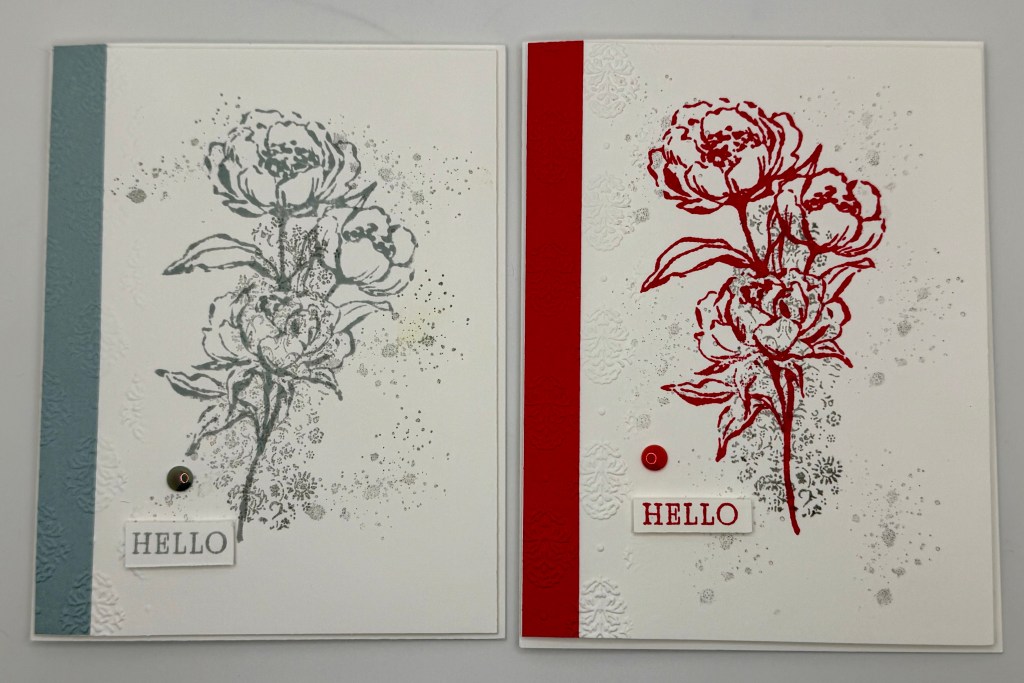
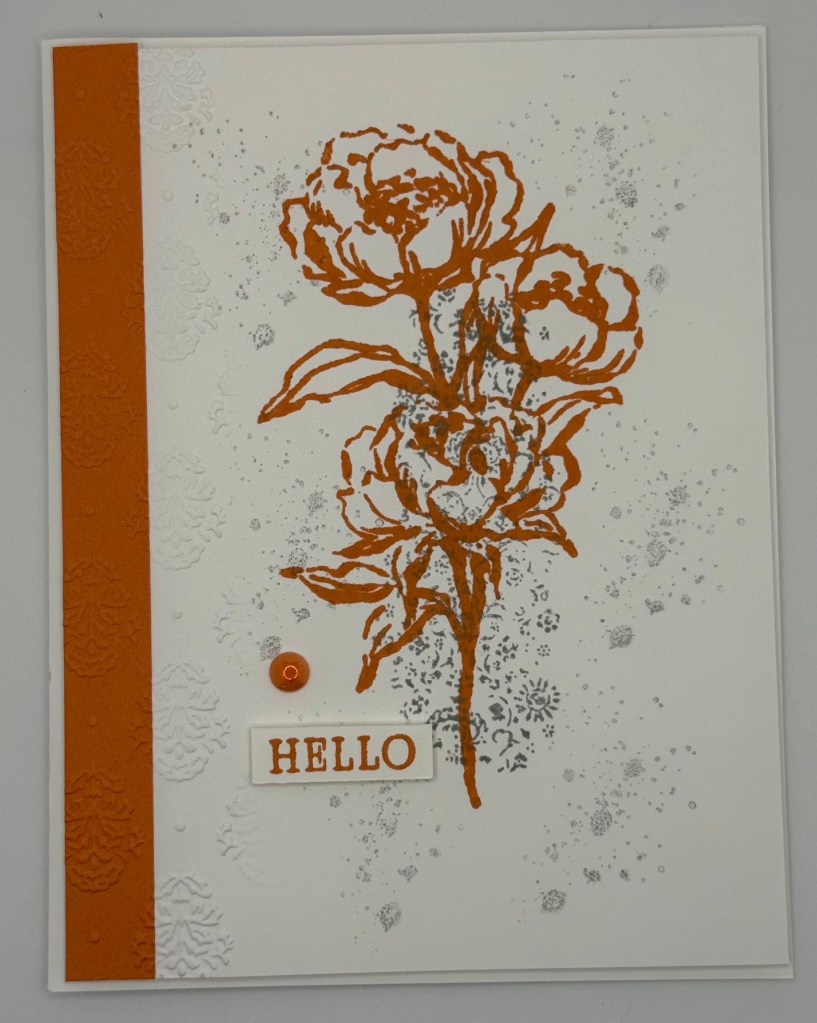
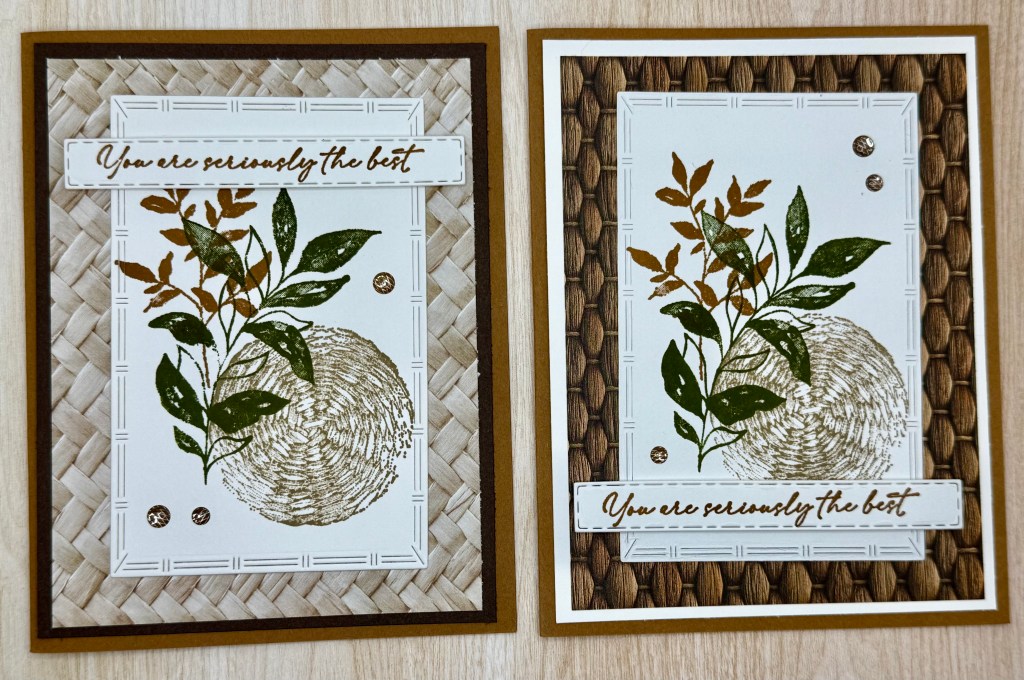
    I’m always drawn to vintage-inspired backgrounds, so when I saw the Elements of Texture stamp set, it immediately became a favorite. Pairing it with the delicate florals in Spotlight on Nature brought this design to life.

    Step-by-Step Instructions:

    • Stamp the Flower – Begin by stamping the flower image from Spotlight on Nature using Memento Black Ink on your card front. This ink is perfect for coloring as it won’t bleed.
    • Add Color with a Blender Pen – Using a Blender Pen, softly color in the flower with Pretty in Pink for the petals and Soft Sea Foam for the leaves.
      • Tip: Place a drop or two of ink from your re-inkers onto a palette or clear block. Dip your Blender Pen into the ink to “paint” with precision.
    • Create the Background – Lightly stamp background elements from the Elements of Texture set using Crumb Cake Ink. This adds a soft, vintage layer that doesn’t overwhelm the main image.
    • Add a Sentiment – Stamp your sentiment in Memento Black so it stands out crisply over the textured background.
    • Finishing Touches – A few Brushed Brass Butterflies add just the right amount of shimmer and elegance to complete the card.
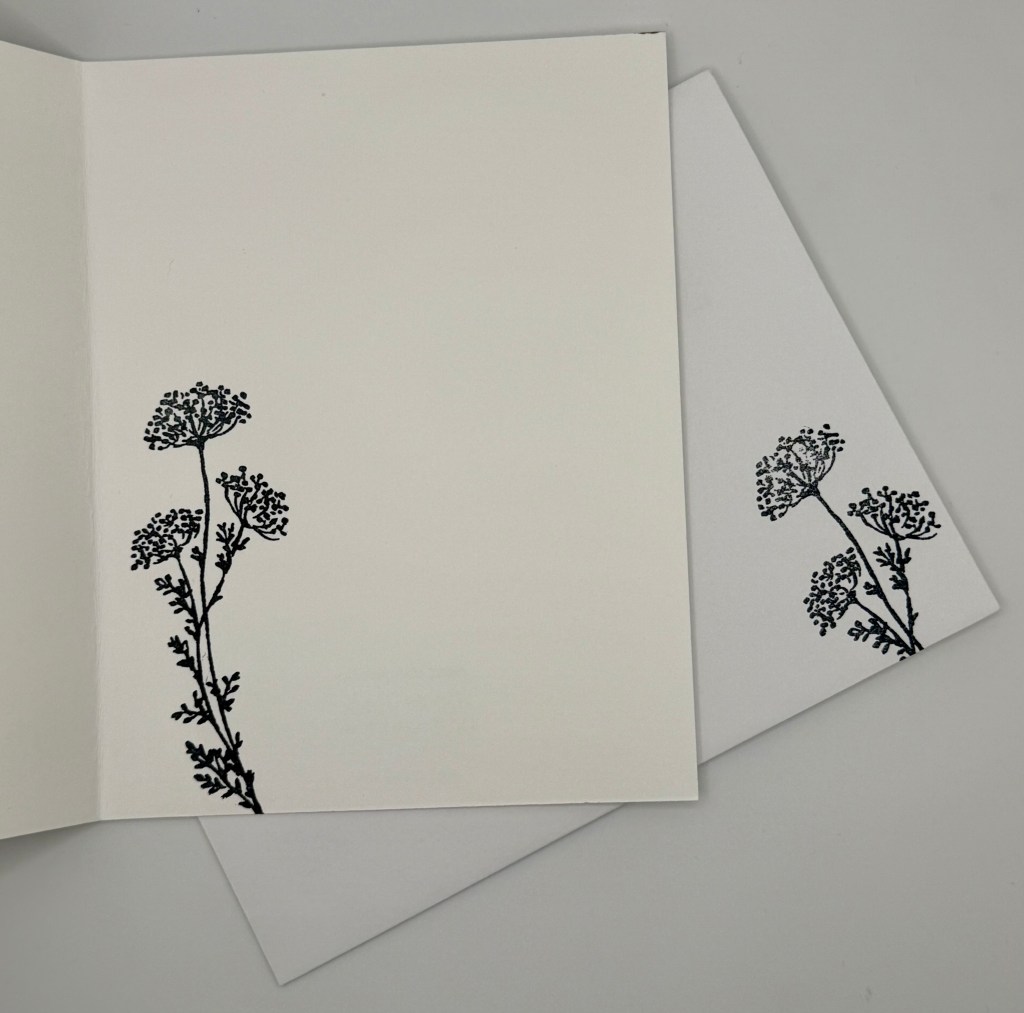
    • Don’t Forget the Inside – To tie everything together, I stamped the same flower image inside the card and on the envelope. It’s a small detail that makes a big difference in presentation.

    This card design is timeless and adaptable—perfect for sympathy, thinking of you, or even encouragement cards. I hope it inspires you to pull out your Blender Pens and start creating something beautiful and meaningful.

    Cardstock Cuts for this project:

    • Basic Black – 8-1/2″ x 5-1/2″ scored at 4-1/4
    • Crumb Cake – 5-3/8″ x 3-1/8″ panel
    • Very Vanilla – 5-1/4″ x 4″ (Inside panel), 5-1/4″ x 4″ (outside panel)

    Stampin’ Up! products used to create this project:

    164774
    Elements Of Text Cling Stamp Set – 164774

    Price: $26.00

    163579
    Spotlight On Nature Cling Stamp Set (English) – 163579

    Price: $23.00

    163378
    Unbounded Love Photopolymer Stamp Set (English) – 163378

    Price: $25.00

    158136
    Brushed Brass Butterflies – 158136

    Price: $10.00

    102845
    Blender Pens – 102845

    Price: $14.00

    147166
    Soft Sea Foam Classic Stampin’ Ink Refill – 147166

    Price: $5.50

    163816
    Pretty In Pink Classic Stampin’ Ink Refill – 163816

    Price: $5.50

    132708
    Tuxedo Black Memento Ink Pad – 132708

    Price: $8.00

    147116
    Crumb Cake Classic Stampin’ Pad – 147116

    Price: $9.00

    121045
    Basic Black 8-1/2″ X 11″ Cardstock – 121045

    Price: $14.00

    120953
    Crumb Cake 8-1/2″ X 11″ Cardstock – 120953

    Price: $14.00

    166784
    Very Vanilla 8-1/2″ X 11″ Cardstock – 166784

    Price: $14.00

    Add All to Cart

    Supply List

    Continue reading →: Vintage-Inspired Sympathy Card Using Elements of Text
  • Card, Christmas

    Merry Christmas in July!

    Published by

    Nicole Black

    on

    July 25, 2025
    Merry Christmas in July!

    What better way to celebrate than with a festive handmade card? Today, I’m sharing a cheerful Christmas card using the Jolly Holly Bundle and Embossing Folder, available online only. You might recognize this bundle from the Christmas Gift Boxes I shared recently—it’s quickly becoming one of my favorites!

    This design is wonderfully versatile and works beautifully with any coordinating Designer Series Paper (DSP) and color palette. For a fun twist, I went with a non-traditional color scheme featuring the new In Color, Strawberry Slush. It adds a fresh and modern pop to the holiday season!

    Card Preparation:

    • Emboss a Crumb Cake panel using the Jolly Holly Embossing Folder.
    • Die cut a circle using the Spotlight on Nature Dies and stamp your sentiment from the Jolly Holly stamp set in the center.
    • On a piece of scrap cardstock, stamp a few poinsettias and die cut them out.

    Assembly Instructions:

    • Use Stampin’ Dimensionals to adhere the embossed Crumb Cake panel to your card base for added texture and depth.
    • Wrap ribbon around your DSP panel and secure it in place before adhering the panel to the card front.
    • Attach the sentiment circle to the center of your card with more dimensionals.
    • Embellish the card with your die-cut poinsettias and a few rhinestones for some festive sparkle.
    • Don’t forget to decorate the inside of the card and your envelope for a polished, professional finish!

    Whether you’re getting a head start on your holiday card stash or simply celebrating Christmas in July, this card is sure to spread a little seasonal cheer. 🎄

    Cardstock Cuts for this project:

    • Crumb Cake – 8-1/2″ x 5-1/2″ scored at 4-1/4; 5-1/4″ x 4″ panel
    • Basic White – 5-1/4″ x 4″ inside panel; 3″ x 3″ for Circle Die, scrap for Poinsettia Dies
    • On the Go DSP – 4″ x 2″ panel

    Stampin’ Up! products used to create this project:

    166120
    Jolly Holly Bundle (English) – 166120

    Price: $54.00

    166119
    Jolly Holly Hybrid Embossing Folder – 166119

    Price: $41.00

    163580
    Spotlight On Nature Dies – 163580

    Price: $35.00

    161633
    Gold & Silver 1/8″ (3.2 Mm) Trim Combo Pack – 161633

    Price: $9.00

    144220
    Rhinestone Basic Jewels – 144220

    Price: $6.00

    165566
    On The Go 12″ X 12″ (30.5 X 30.5 Cm) Designer Series Paper – 165566

    Price: $12.50

    165286
    Strawberry Slush Classic Stampin’ Pad – 165286

    Price: $9.00

    120953
    Crumb Cake 8-1/2″ X 11″ Cardstock – 120953

    Price: $14.00

    166780
    Basic White 8-1/2″ X 11″ Cardstock – 166780

    Price: $14.00

    104430
    Stampin’ Dimensionals – 104430

    Price: $4.25

    144108
    Mini Stampin’ Dimensionals – 144108

    Price: $4.25

    103683
    Mini Glue Dots – 103683

    Price: $7.25

    Add All to Cart

    Supply List

    Continue reading →: Merry Christmas in July!
  • 3D Project, Christmas

    Easy Christmas Gift Box – Perfect for Co-Workers!

    Published by

    Nicole Black

    on

    July 18, 2025
    Easy Christmas Gift Box – Perfect for Co-Workers!

    While browsing for fun and simple gift ideas, I came across an adorable box design that immediately struck me as the perfect little gift for co-workers. Since it’s Christmas in July, I thought—why not make a festive version to share with you now?

    These boxes are quick to make and a great way to use up some of that leftover Designer Series Paper (DSP) you might have tucked away. I used a retired holiday DSP from last year, and it worked beautifully.

    Instructions to Make the Box:

    • Cut your DSP to 11″ x 4″
    • Score along the long side at 3″, 4″, 8″, and 9″
    • Rotate your paper one quarter turn and score again at 1″ and 3″
    • Fold along all the score lines to define your box shape
    • On the 1″ side, snip along the folds at the 3″, 4″, 8″, and 9″ marks to create flaps
    • Add Tear-n-Tape to the small tabs and assemble the box
    • Decorate the top with embellishments, die cuts, or tags
    • Finish it off by tying a ribbon around the box to hold it closed

    Step by Step: Easy Christmas Gift Box

    That’s it! You now have a cute and functional gift box ready to fill with goodies, gift cards, or even a few handmade treats.

    ✨ And here’s a little sneak peek! I used elements from one of the stunning new Suites launching this September. I’m in love with the soft blues and all that sparkly bling—it’s a winter wonderland in paper form!

    Cardstock Cuts for this project:

    • Designer Series Paper – 11″ x 4″ scored at 3″, 4″, 8″, 9″. Rotate and score at 1″ and 3″

    Stampin’ Up! products used to create this project:

    166120
    Jolly Holly Bundle (English) – 166120

    Price: $54.00

    164324
    Season Of Green & Gold 12″ X 12″ (30.5 X 30.5 Cm) Specialty Designer Series Paper – 164324

    Sale: $11.55

    Price: $16.50

    161633
    Gold & Silver 1/8″ (3.2 Mm) Trim Combo Pack – 161633

    Price: $9.00

    147084
    Real Red Classic Stampin’ Pad – 147084

    Price: $9.00

    147111
    Mossy Meadow Classic Stampin’ Pad – 147111

    Price: $9.00

    133676
    Mossy Meadow 8-1/2″ X 11″ Cardstock – 133676

    Price: $14.00

    166780
    Basic White 8-1/2″ X 11″ Cardstock – 166780

    Price: $14.00

    144108
    Mini Stampin’ Dimensionals – 144108

    Price: $4.25

    154031
    Tear & Tape Adhesive – 154031

    Price: $7.00

    Add All to Cart

    Supply List

    Continue reading →: Easy Christmas Gift Box – Perfect for Co-Workers!
  • 3D Project, Checklist, Christmas, Organization

    My Christmas Planner: Paper vs. Digital

    Published by

    Nicole Black

    on

    July 15, 2025
    My Christmas Planner: Paper vs. Digital

    When I first started planning for the holidays, I used a paper planner—and as a crafter, I couldn’t help but turn it into a mini scrapbook! I loved being able to design each section with festive embellishments and handwritten notes. It made the process feel both organized and creative.

    If you’re a fellow fan of paper planners, I’ve got something for you! I’m sharing the Christmas Planner Templates I used. These are designed for a 6″ x 8″ format, perfect for a small scrapbook album. I printed them on thin cardstock and used sheet protectors to create durable divider pages.

    📎 Download the Christmas Planner Template

    Products I used to create my planner:

    101650
    Very Vanilla 8-1/2″ X 11″ Cardstock – 101650

    Price: $13.00

    Add to Cart
    163883
    Basic Black 6″ X 8″ (15.2 X 20.3 Cm) Album – 163883

    Price: $11.50

    Add to Cart
    Add All to Cart

    Supply List

    As time went on, I transitioned my Christmas planner to Microsoft OneNote. I now have each planner category as a separate section in my notebook (like Gifts, Crafts, Recipes, Decor), and each year I add a new page under each section. This lets me easily look back at what worked (or didn’t!) and tweak things year to year—without starting from scratch.

    Whether you’re a paper planner lover or prefer digital organization, the key is finding a system that works for you—and that keeps the season joyful, not stressful.

    🎄 Do you use a paper or digital planner for the holidays? Let me know in the comments!

    Continue reading →: My Christmas Planner: Paper vs. Digital
  • Checklist, Christmas, Organization

    It’s Christmas in July! Let the Holiday Planning Begin

    Published by

    Nicole Black

    on

    July 1, 2025
    It’s Christmas in July! Let the Holiday Planning Begin

    Yes, it’s hot outside—but that won’t stop me from cranking down the A/C, pouring hot chocolate into a festive mug, and curling up with a Hallmark Christmas movie (or two!). We’re officially six months away from Christmas Day, and for me, that means one thing: the countdown is ON.

    As a Project Manager by trade, I treat the holidays like my favorite project of the year—full of joy, sparkle, and spreadsheets! I want to do all the magical things without burning out. The secret? Starting early, staying organized, and keeping it fun. If you’re like me and want your most joyful, stress-free Christmas yet, join me on this journey.

    🎅 July Kickoff: Setting the Foundation

    This month is all about setting up your plan. That means creating your master gift list, outlining your budget, and getting your Christmas notebook or planner ready. We’re not rushing anything—just laying the groundwork so the rest of the season runs smoothly

    🎁 Master Gift List & Budget

    Let’s talk about one of the most important tools in your holiday toolkit: your gift list.

    As an iPhone user, I rely on the free app The Christmas Gift List, but there are lots of great options available for Android too—just find one that works for your style.

    At a minimum, look for an app that lets you:

    • Add names to your list
    • Set a budget per person
    • Track your total budget and spending
    • Log gift ideas, purchases, wrapping, and delivery status

    Some bonus features I love in my app:

    • Organize people by groups (Family, Friends, Co-Workers, etc.)
    • Look back at previous gifts so you don’t repeat
    • Carry over ideas from one year to the next
    • View reports like: who still needs a gift idea, what’s been purchased, wrapped, or shipped
    • Share your list (I share with my husband—even if I’m not convinced he checks it!)

    Bonus Tip: I also use a second app (with a passcode!) just for tracking gifts for my husband. Gotta keep some surprises a secret!

    📒 Coming Up…

    In an upcoming post, I’ll show you how I set up my Christmas Planner—another tool that keeps everything from menus to mailing deadlines organized and at my fingertips.

    But for now, take the first step:
    ✨ Choose your gift tracking method
    ✨ Set your overall budget
    ✨ Start brainstorming ideas

    Then reward yourself by cozying up with a Christmas movie. After all, planning should be part of the fun!


    Let’s make this the merriest, most magical season ever—without the last-minute panic.
    Stick with me and we’ll make Christmas 2025 the most joyful one yet!

    Continue reading →: It’s Christmas in July! Let the Holiday Planning Begin
  • Birthday, Card, Fancy Fold, General, Masculine

    Set Sail with This Simple Summer Fold

    Published by

    Nicole Black

    on

    June 26, 2025
    Set Sail with This Simple Summer Fold

    It’s officially summer—or if you’re in Florida like me, it’s been summer for a while now! Either way, this card is perfect for the season. With its fresh nautical theme, it’s great for any occasion, and the colors and layout also make it a fantastic masculine card—something we always need more of in our stash.

    This design features a simple fancy fold that adds interest without adding complexity. Here’s how to create the base:

    • Cut your cardstock to 11″ x 4-1/4″
    • Score at 4-1/4″ and 5-1/2″

    To assemble, fold along the score lines and adhere the small 1-1/4″ panel on the left to the inside of the card. I used Tear & Tape for a strong hold. And that’s it—your base is done!

    Below, I’ve included the dimensions for the layered panels I used, but feel free to play around with your own combinations or skip the layers altogether for a cleaner look.

    I’m showcasing the Sunrise Sailing Bundle, which includes a stamp set, dies, and a coordinating embossing folder—a great value with a lot of versatility. The embossing folder not only adds texture but also embosses the clouds and sailboat. On this card, I used those embossed images to perfectly align my die cuts. Such a helpful feature!

    The stamp set also includes wave images, which I loved so much I added them to the inside of the card for a fun finishing touch.

    Since I wanted this to be a birthday card, I added a sentiment from the Beautiful Butterflies stamp set: “Happy Birthday.” Simple and timeless.

    Cardstock Cuts for this project:

    • Cloud Cover – 11″ x 4-1/4″ scored at 4-1/4″ and 5-1/2″, 4″ x 4″ panel, 4″ x 1″ panel
    • Secret Sea – 4-1/8″ x 4-1/8″ front panel, 4-1/8″ x 4-1/8″ inside panel, 4-1/8″ x 1-1/8″ panel
    • Basic White – 4″ x 4″ inside panel, 3-1/2″ x 3″ for Boat, scrap for Cloud Dies

    Stampin’ Up! products used to create this project:

    165497
    Sunrise Sailing Bundle (English) – 165497

    Price: $50.25

    164608
    Beautiful Butterflies Photopolymer Stamp Set (English) – 164608

    Price: $24.00

    164051
    Real Red & White Baker’s Twine – 164051

    Price: $5.00

    165285
    Secret Sea Classic Stampin’ Pad – 165285

    Price: $9.00

    147084
    Real Red Classic Stampin’ Pad – 147084

    Price: $9.00

    161665
    Pecan Pie Classic Stampin’ Pad – 161665

    Price: $9.00

    165621
    Cloud Cover 8-1/2″ X 11″ Cardstock – 165621

    Price: $14.00

    165624
    Secret Sea 8-1/2″ X 11″ Cardstock – 165624

    Price: $14.00

    166780
    Basic White 8-1/2″ X 11″ Cardstock – 166780

    Price: $14.00

    104430
    Stampin’ Dimensionals – 104430

    Price: $4.25

    144108
    Mini Stampin’ Dimensionals – 144108

    Price: $4.25

    103683
    Mini Glue Dots – 103683

    Price: $7.25

    Add All to Cart

    Supply List

    Continue reading →: Set Sail with This Simple Summer Fold
  • Card, General

    Hello – I’m Back!

    Published by

    Nicole Black

    on

    June 19, 2025
    Hello – I’m Back!

    I’m feeling refreshed and inspired after an absolutely incredible trip to Japan! From the cherry blossoms to the culture, it was everything we hoped for and more. I also took a little crafting break, and now I’m diving back in, just in time to get excited for Christmas in July and the kickoff of holiday planning!

    Today, I’m thrilled to share a fun card that features the brand new 2025–2027 In Colors. This collection is absolutely stunning, and a few of the shades have already landed on my favorites list!

    From left to right, the colors featured are:

    • Timid Tiger
    • Secret Sea
    • Darling Duckling
    • Cloud Cover
    • Strawberry Slush

    📝 Note: Cloud Cover doesn’t have an ink pad available due to manufacturing issues. I created my own by adding the Cloud Cover Ink Refill to an Uninked Stampin’ Spot—worked like a charm! You could also use a Stampin’ Write Marker to color your stamp directly.

    The Card Design

    This is a clean, simple design that really lets the new colors shine. I used a Basic White card base with an additional Basic White layer popped up using Dimensionals. Along the left edge, I added a strip of each In Color—such a great way to showcase them all!

    In the center, I stamped the flower from Gallery Blooms, and layered in some background texture using the Beautiful Motifs stamp set in Smoky Slate to give that artsy splattered look.

    If you look closely, you’ll see I added subtle texture by embossing just the area to the left of the flower with the Damask Designs Embossing Folder. Here’s a tip for this partial embossing technique: place the entire layer inside your folder, but only cover the part you want embossed with your cutting plates. That way, you avoid that unwanted line that can show up when the plates press too far.

    The Finishing Touches

    To complete the front, I stamped “Hello,” fussy-cut it, and popped it up with Dimensionals. A sweet little In Color Flat Pearl adds just the right touch of shine and ties everything together beautifully.

    Don’t forget the inside and the envelope! I stamped a coordinating flower from Gallery Blooms in the same In Color used on the card. You can turn this into any occasion by simply adding a sentiment later—I love leaving the inside blank until I know what I need it for.

    I hope this card inspires you to dive into the new In Colors and start dreaming up your next project! Let me know which color is your favorite—I’d love to hear.

    Happy stamping! 💌

    Cardstock Cuts for this project:

    • 25-27 In Colors – 5-3/8″ x 1/2″
    • Basic White Thick – 8-1/2″ x 5-1/2″ scored at 4-1/4 card base
    • Basic White – 5-3/8″ x 4-1/8″, scrap for the “Hello”

    Stampin’ Up! products used to create this project:

    165198
    Beautiful Motifs Photopolymer Stamp Set (English) – 165198

    Price: $18.00

    165211
    Gallery Blooms Photopolymer Stamp Set – 165211

    Price: $19.00

    164774
    Elements Of Text Cling Stamp Set – 164774

    Price: $26.00

    165214
    Damask Designs Embossing Folder – 165214

    Price: $9.50

    165623
    2025-2027 In Color™ 8-1/2″ X 11″ Cardstock – 165623

    Price: $14.00

    165192
    2025-2027 In Color™ Flat Pearls – 165192

    Price: $8.50

    165285
    Secret Sea Classic Stampin’ Pad – 165285

    Price: $9.00

    165286
    Strawberry Slush Classic Stampin’ Pad – 165286

    Price: $9.00

    165278
    Timid Tiger Classic Stampin’ Pad – 165278

    Price: $9.00

    165277
    Darling Duckling Classic Stampin’ Pad – 165277

    Price: $9.00

    165279
    Cloud Cover Classic Stampin’ Ink Refill – 165279

    Price: $5.50

    141822
    Uninked Stampin’ Spots – 141822

    Price: $10.00

    147113
    Smoky Slate Classic Stampin’ Pad – 147113

    Price: $9.00

    166780
    Basic White 8-1/2″ X 11″ Cardstock – 166780

    Price: $14.00

    159229
    Basic White 8-1/2″ X 11″ Thick Cardstock – 159229

    Price: $17.00

    104430
    Stampin’ Dimensionals – 104430

    Price: $4.25

    144108
    Mini Stampin’ Dimensionals – 144108

    Price: $4.25

    103579
    Paper Snips Scissors – 103579

    Price: $12.00

    126200
    Stampin’ Scrub – 126200

    Price: $21.00

    Add All to Cart

    Supply List

    Continue reading →: Hello – I’m Back!
  • Travel, Uncategorized

    A Dream Come True: Our Cherry Blossom Adventure in Japan

    Published by

    Nicole Black

    on

    March 30, 2025
    A Dream Come True: Our Cherry Blossom Adventure in Japan

    My husband and I are about to embark on a dream trip that has been on our bucket list for years—Japan! We’ll be spending two weeks exploring Tokyo, Hakone, Kyoto, Osaka, and Hiroshima, immersing ourselves in the culture, history, and, of course, the amazing food.

    We were intentional in planning our visit for April, hoping to experience the breathtaking beauty of cherry blossoms in full bloom. Seeing them in person has been a longtime dream, and we can’t wait!

    During our travels, I won’t be posting on my blog, but I’ll be sharing updates, photos, and highlights on Facebook and Instagram—so be sure to follow along there!

    Continue reading →: A Dream Come True: Our Cherry Blossom Adventure in Japan
  • Birthday, Card, General, Thank You

    Vintage Charm & Textured Elegance with the Botanical Textures Suite

    Published by

    Nicole Black

    on

    March 27, 2025
    Vintage Charm & Textured Elegance with the Botanical Textures Suite

    I’ve always loved a vintage look on a card, and I’m a huge fan of texture elements—so when I saw the Botanical Textures Suite Collection, I was instantly in love!

    The Textured Notes Dies are one of my favorite features of this suite. Each rectangle has a unique edge design, adding beautiful variation and interest to the layout.

    For this set of cards, I experimented with all the designs in the Designer Series Paper (DSP) pack, changing up the back layer to either Basic White or Early Espresso, depending on what best complemented the DSP.

    Instead of using the embellishments from the suite, I opted for Pecan Pie & Clear Ribboned Dots, simply because I had so many on hand. However, the Neutral Matte Dots would also be a great choice!

    One of my favorite details is the basket weave stamp from the set—it’s too good not to use! I stamped it on the inside of the card and even on the envelope for a cohesive, finished look.

    This collection has so many possibilities, and I can’t wait to create more with it!

    Cardstock Cuts for this project:

    • Pecan Pie – 8-1/2″ x 5-1/2″ scored at 4-1/4 card base
    • Basic White – 5-1/4″ x 4″ inside panel, 5-1/4′ x 5″ panel (half the cards have this layer), 3-3/4″ x 3/4″ for Label Die, 4-1/4″ x 3″ for Rectangle Die
    • Early Espresso – 5-1/4′ x 5″ panel (half the cards have this layer)
    • Woven Textures DSP – 5″ x 3-3/4″ Panel

    Stampin’ Up! products used to create this project:

    165563
    Botanical Textures Suite Collection (English) – 165563

    Price: $100.50

    165556
    Textured Notes Bundle (English) – 165556

    Price: $48.50

    164204
    Pecan Pie & Clear Ribboned Adhesive-Backed Dots – 164204

    Price: $8.50

    165561
    Neutral Matte Dots – 165561

    Price: $8.00

    165560
    Woven Textures 12″ X 12″ (30.5 X 30.5 Cm) Designer Series Paper – 165560

    Price: $12.50

    147116
    Crumb Cake Classic Stampin’ Pad – 147116

    Price: $9.00

    161665
    Pecan Pie Classic Stampin’ Pad – 161665

    Price: $9.00

    147111
    Mossy Meadow Classic Stampin’ Pad – 147111

    Price: $9.00

    161717
    Pecan Pie 8-1/2″ X 11″ Cardstock – 161717

    Price: $11.50

    119686
    Early Espresso 8-1/2″ X 11″ Cardstock – 119686

    Price: $11.50

    166780
    Basic White 8-1/2″ X 11″ Cardstock – 166780

    Price: $14.00

    104430
    Stampin’ Dimensionals – 104430

    Price: $4.25

    Add All to Cart

    Supply List

    Continue reading →: Vintage Charm & Textured Elegance with the Botanical Textures Suite
  • Birthday, Card

    Adorable & Versatile: A Sweet Peas Birthday Card

    Published by

    Nicole Black

    on

    March 21, 2025
    Adorable & Versatile: A Sweet Peas Birthday Card

    I couldn’t stop at just one! After making the baby card (here), I decided to create an adorable birthday card using the same Sweet Peas set and color palette. Just like the baby card, this design is super versatile—you can easily switch up the colors for a completely different look!

    These little peas are just too cute, and I had so much fun coloring them with Stampin’ Blends! Adding shadows really brought them to life and gave them extra dimension.

    To create contrast, I used Dimensionals to pop up and separate the Granny Apple Green and Lemon Lime Twist layers. And, of course, I couldn’t resist adding another sweet little pea to the inside of the card for an extra touch of charm.

    Overall, this card is simple, fun, and perfect for any birthday celebration!

    Cardstock Cuts for this project:

    • Balmy Blue – 11″ x 4-1/4″ scored at 5-1/2 card base
    • Basic White – 5-1/4″ x 4″ inside panel, 4-1/4″ x 3″ panel
    • Lemon Lime Twist – 4-3/4″ x 3-1/2″ panel
    • Granny Apple Green – 4-1/2″ 3-1/4″ panel

    Stampin’ Up! products used to create this project:

    163621
    Sweet Peas Photopolymer Stamp Set (English) – 163621

    Price: $20.00

    154830
    Balmy Blue Stampin’ Blends Combo Pack – 154830

    Price: $11.00

    161682
    Lemon Lime Twist Stampin’ Blends Combo Pack – 161682

    Price: $11.00

    132708
    Tuxedo Black Memento Ink Pad – 132708

    Price: $8.00

    146982
    Balmy Blue 8-1/2″ X 11″ Cardstock – 146982

    Price: $11.50

    144245
    Lemon Lime Twist 8-1/2″ X 11″ Cardstock – 144245

    Price: $11.50

    146990
    Granny Apple Green 8-1/2″ X 11″ Cardstock – 146990

    Price: $11.50

    159276
    Basic White 8-1/2″ X 11″ Cardstock – 159276

    Price: $13.00

    104430
    Stampin’ Dimensionals – 104430

    Price: $4.25

    Add All to Cart

    Supply List

    Continue reading →: Adorable & Versatile: A Sweet Peas Birthday Card
Previous Page Next Page

Hello,

I’m Nicole

I am a project manager by day and a crafter by night. I love Christmas and want to do it all every year. I will share with you how I do it and enjoy it too!

Let’s connect

  • Facebook
  • Instagram
  • Pinterest
  • YouTube
  • Link

Join the fun!

Stay updated with our latest tutorials and ideas by joining our newsletter.

Recent posts

  • Greenery Lane: Washi Tape Background & Fun Fold Design

    Greenery Lane: Washi Tape Background & Fun Fold Design

  • Not a Scrap Wasted: Nature Walk Guy Cards

    Not a Scrap Wasted: Nature Walk Guy Cards

  • Sweet Treats to Share with the Endless Love Suite

    Sweet Treats to Share with the Endless Love Suite

  • A Whimsical Valentine with the Endless Love Suite

    A Whimsical Valentine with the Endless Love Suite

  • A Sweet Start to Valentine’s Day Crafting

    A Sweet Start to Valentine’s Day Crafting

  • A Thoughtful Reset: How I Pack Up Christmas for Next Year

  • 3D Project
  • Baby
  • Birthday
  • Card
  • Checklist
  • Christmas
  • Easter
  • Fall
  • Fancy Fold
  • Foodie
  • General
  • Gift Giving
  • Halloween
  • Kit
  • Masculine
  • New Years
  • Organization
  • Sympathy
  • Technique
  • Thank You
  • Thanksgiving
  • Thinking of You
  • Travel
  • Uncategorized
  • Valentine's Day
  • Winter

Christmas Cheer Central

  • Pinterest
  • Instagram
  • Facebook
  • Mail
  • Posts
  • About

Blog at WordPress.com.


Loading Comments...