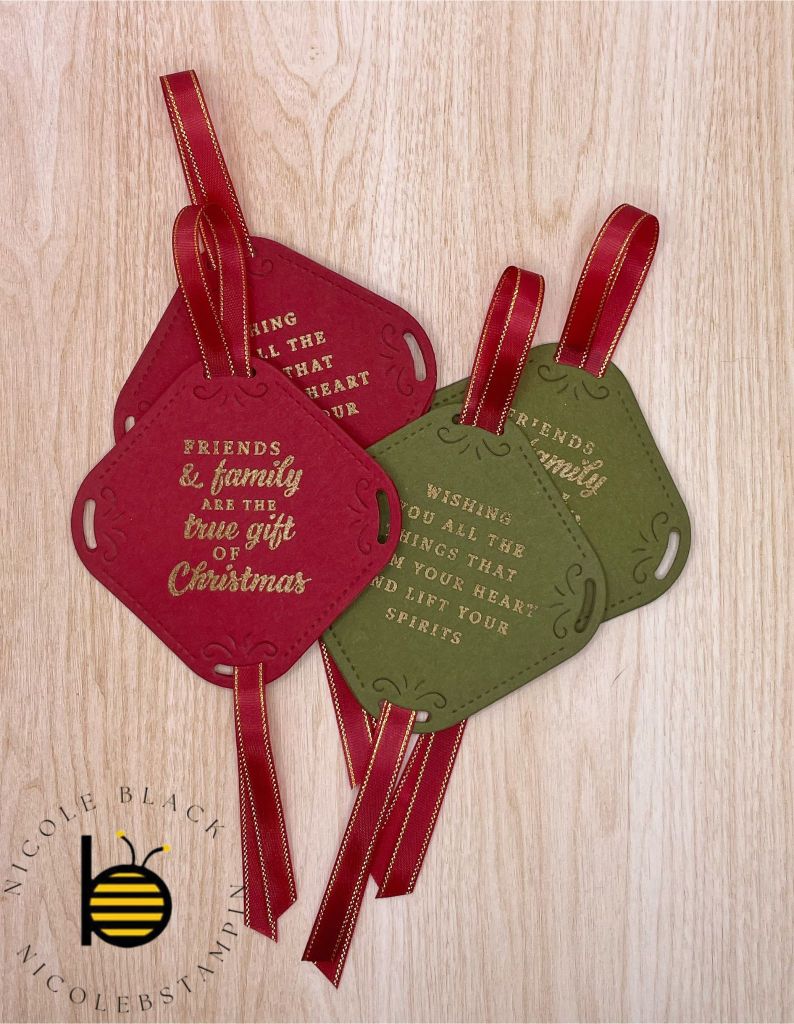
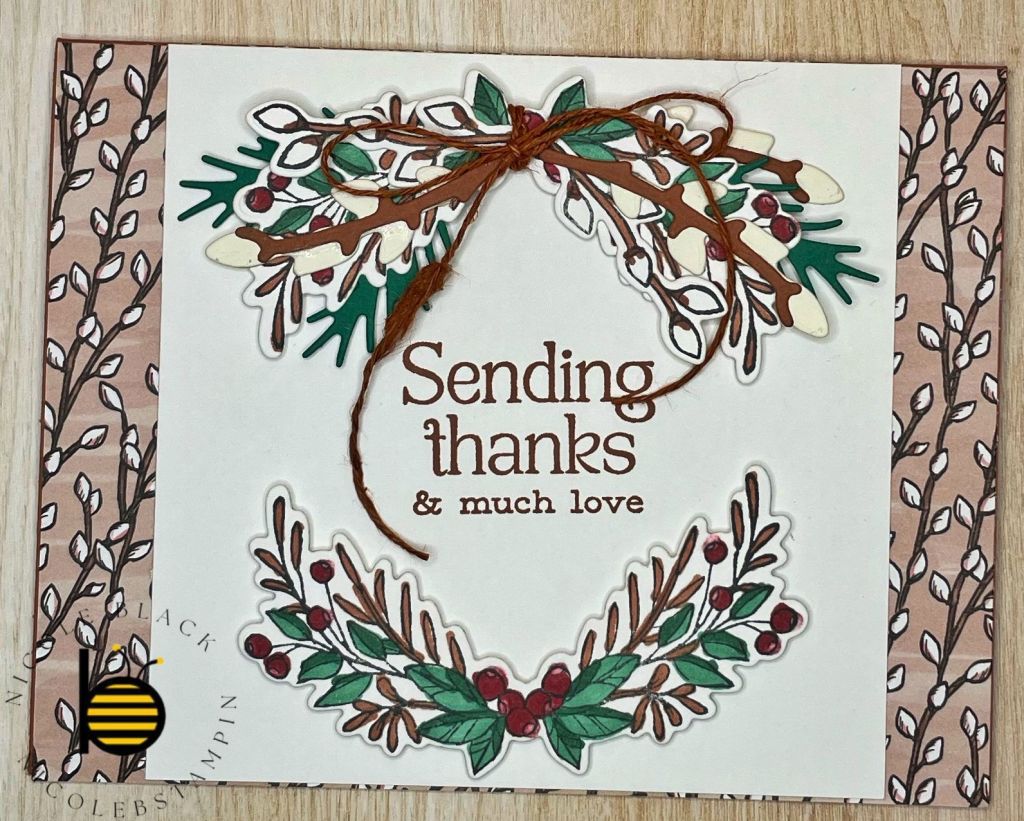
I love to make my own gift tags. I think they make a gift a little more personal. I have a lot of ideas for gift tags that I want to make this year so I will have several posts on gift tags. These are made with the Peaceful Seasons Bundle. Checkout page 24 from the new Mini Catalog for where I got the design.
I used Cherry Cobbler and Mossy Meadow to create these tags. The sayings are stamped in Versamark and then heat embossed in gold. The ribbon is the Cherry Cobbler and Gold Ribbon. On the back I heat embossed the words To and From from Greetings of the Season Set. Checkout the video on how they are assembled.
Video Demonstration
Cardstock Cuts for this project:
Mossy Meadow – 2-1/2″ x 2-1/2″
Cherry Cobbler – 2-1/2″ x 2-1/2″
Stampin’ Up! products used to create this project:
I think my favorite thing about Christmas is my husband and my traditions. We have many fun celebrations that we do every year, and we are always open for new ideas. I thought I would share with you our traditions and maybe you will share with me yours. We can swap ideas!
Activity Advent
Everyone is familiar with Advent Calendars. One year I bought a wooden Christmas Tree Advent Calendar with 25 tiny drawers. I painted it and decorated each of the drawers.
This is where we put our Advent Activities that I shared in the October Checklist Post. This is a cherished tradition of ours. I would be honored if it became one of yours too.
Christmas Eve Dinner
Every year we host Christmas Eve dinner for the family. And every year we have a theme; often it is a country. We research holiday traditions and dishes. Sometimes we do traditional foods for the holidays and sometimes we do traditional foods with a holiday spin. We also have a themed cocktail, table decorations, and dessert. Some of our themes have been:
Chinese Take-Out Style (Christmas Story Theme)
Mexico (traditional dishes served at Christmas)
Victorian (Traditional English Christmas)
Italian (Feast of the seven fishes)
Epcot, Holiday’s around the world
Japanese traditional Christmas meal (Kentucky Fried Chicken)
Peruvian
Cuban
Little Tree Presents
This tradition was started by my husband’s parents. Starting seven days before Christmas, they come together each evening and open a “Little Tree Present”. These gifts are small trinkets and are usually Christmas themed. This way the person can enjoy the item while celebrating Christmas. Examples are Christmas socks, mug, pin or earrings, spatula, etc. You get the idea. When my husband and his brother were young, they would get candy or little toys or games.
One moment of everyone tearing open gifts and then it is done always feels like a letdown. This tradition allows you to extend the gift giving and the holiday fun. If you have small children, they also get to open gifts earlier and they are from you and not Santa. It is also a time for the family to come together each night prior to Christmas, slow down, and enjoy the moment, which is what my goal is in all my traditions.
Other Traditions
We love to fully enjoy the holidays, and we want to do everything, so we have a bunch of Activities, besides the Advent Activities, that we do every year:
Picture with Santa
Decorate the Tree Together
Fancy Dinner Date on 12/23
Listen/Read Christmas Carol
Bake Christmas Cookies
Local Christmas Light Drive
Handmade Cards
Handmade Package Toppers
Macy’s Thanksgiving Parade
I want to add a new one this year: Make Eggnog from Scratch.
I would really love to hear your traditions. Please comment and share!
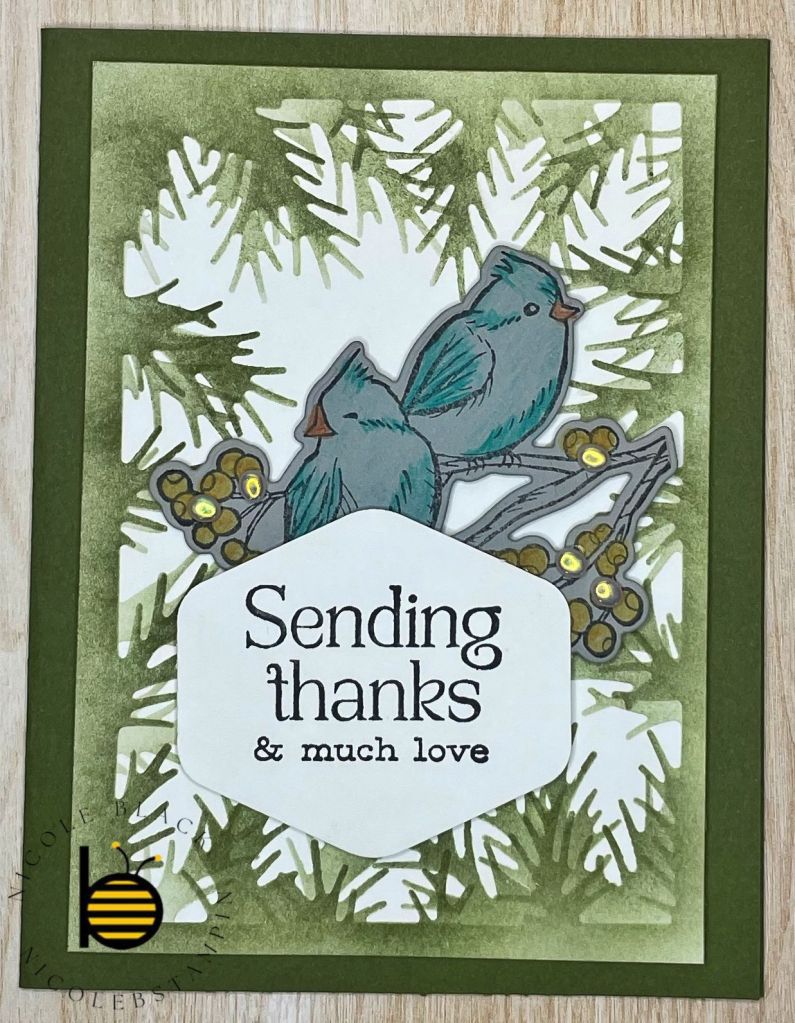
Today, I am featuring the Winterly Tree Tops Suite. I was able to attend Stampin’ Up!’s Creativity Now virtual event over the summer. Creativity Now is a demonstrator-only online event were demonstrators can see exclusive sneak peeks, get a behind-the-scenes look at Stampin’ Up!, and receive specialized technique training for crafting. Additionally, all attendees have the opportunity to see and purchase product from the new mini catalog before anyone else. This is one of the many perks of becoming a Stampin’ Up! demonstrator.
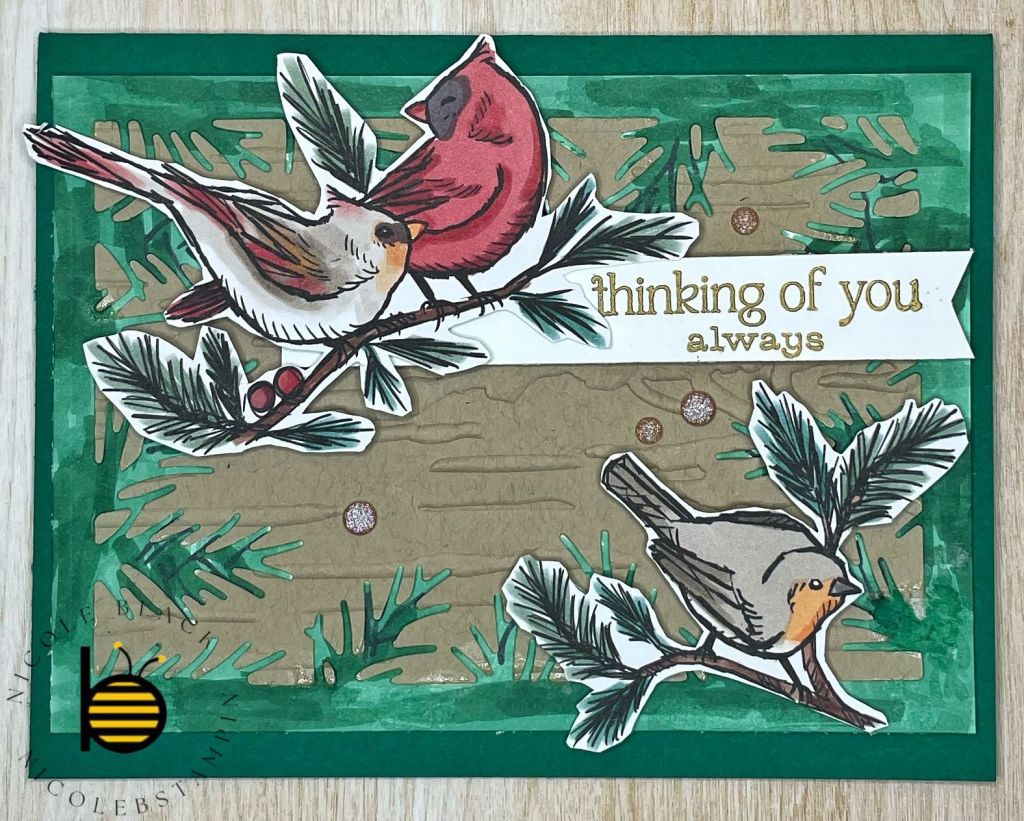
This card uses one of the cards that was a make-n-take but I made it have more of a Christmas look to it. This card uses several techniques including Masking and Stampin’ Bends so be sure to check out the video tutorials to see how they are done.
When assembling the card, I used scotch tape to adhere the 3 branches to the back of the birds. I then used Mini Dimensionals to adhere the birds and branches to the front of the card. The Merry Christmas is punched out using the Heartfelt Hexagon Punch and then adhered to the front of the card with Dimensionals.
Video Tutorial – Masking
Video Tutorial – Stampin’ Blends
Few More Samples
Here are the make-n-takes we made as part of the Creativity Now event.
The colors for this card are Shaded Spruce and Crumb Cake. The border is colored in with Shaded Spruce Stampin’ Blends. The birds are fussy cut from the Designer Series Paper.
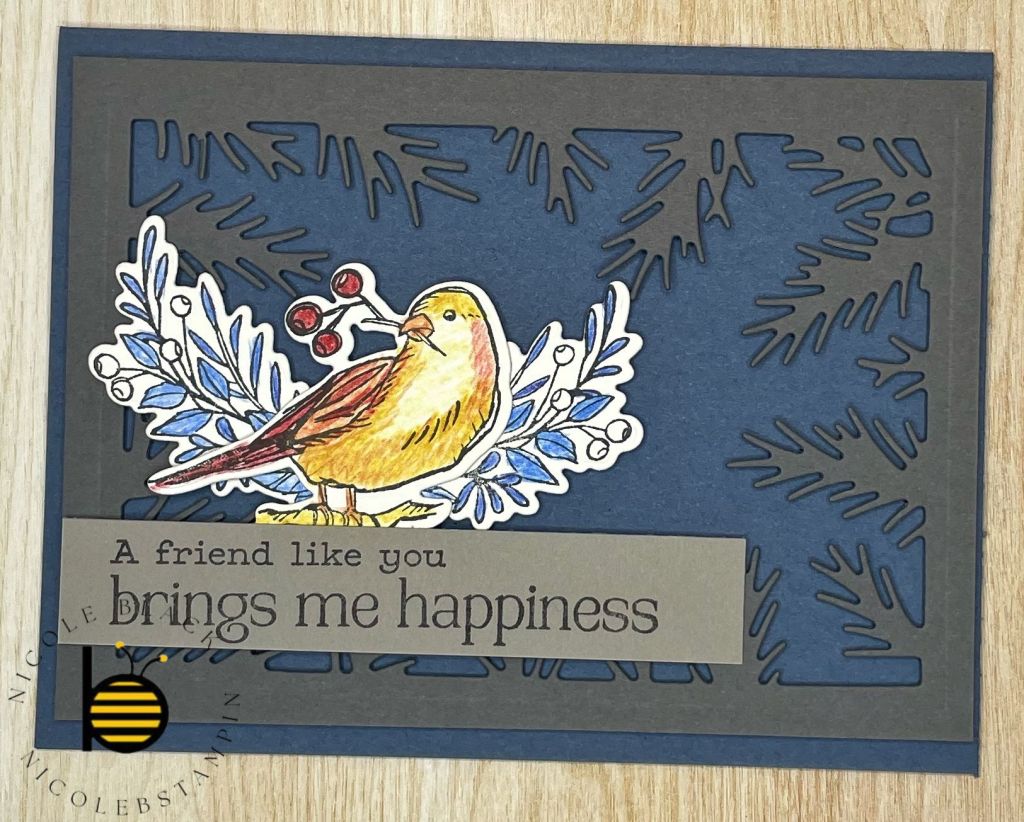
The colors for this card are Basic Gray and Misty Moonlight. The bird was colored with Watercolor Pencils Assortment 2.
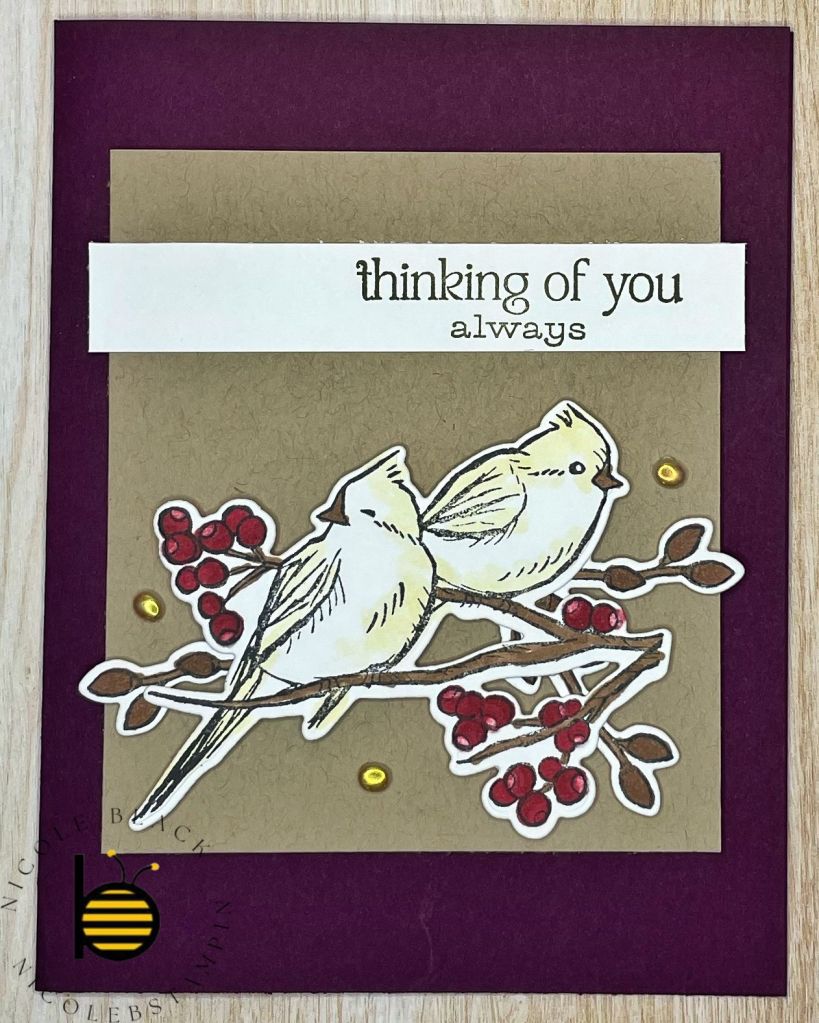
The colors used for this card are Blackberry Bliss and Crumb Cake.
The colors used for this card are Mossy Meadow and Basic Gray. This is the card I modeled for the Christmas card.
The colors used for this card are Copper Clay, Shaded Spruce, and Very Vanilla.
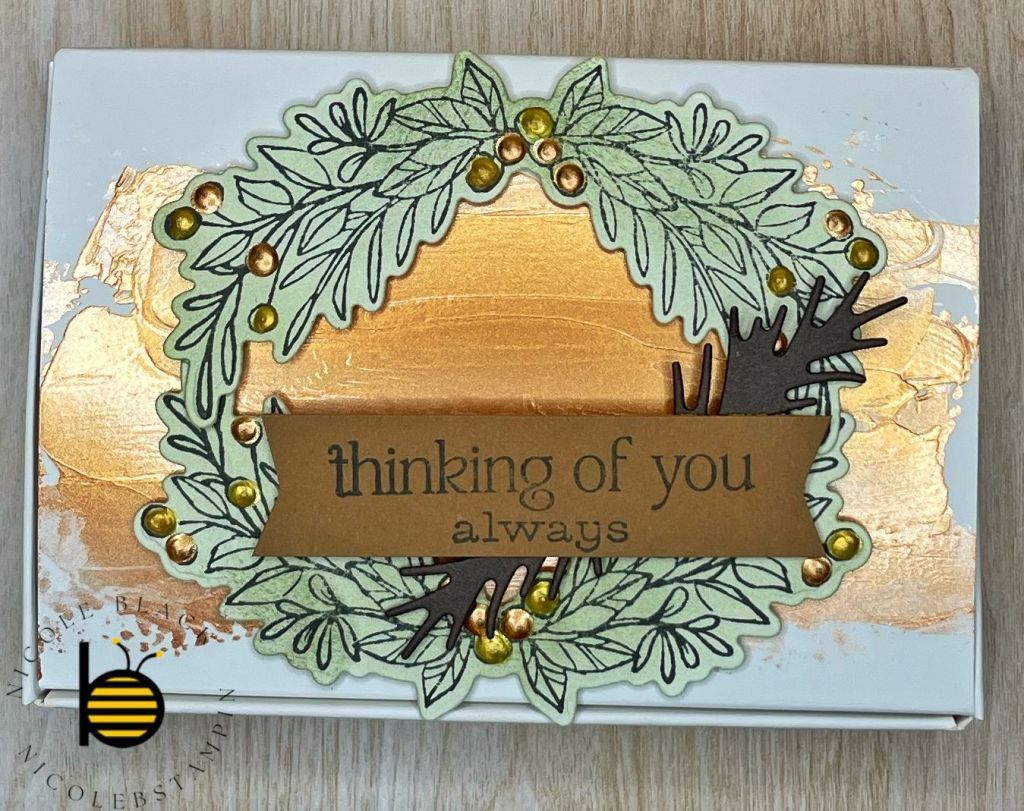
This is a 3D project using Scalloped Gift Card Box. It uses Metallic Enamel Effects Basics. The top is first smeared with the Gold Enamel Effects with a Palette Knife. The wreath is used by adhering two bows together.
Cardstock Cuts for this project:
Cherry Cobbler – 8-1/2″ x 5-1/2″ card base scored at 4-1/4″
Basic White – 5-1/4″ x 4″ panel (inside card), 5-1/8″ x 3-5/8″, 2-1/2″ x 2-1/4″, 5″ x 2-3/4″
Stampin’ Up! products used to create this project:
It is almost September! How are you doing with your preparations? Are you already falling behind? Or are you ready for the next steps?
In September we start on our crafts and check off some tasks early. I like to use September to start to declutter the house to get ready for all the holiday decorating. It is not just Christmas we are preparing for but Halloween and Thanksgiving too. If you declutter and organize now, it will make decorating that much easier next month.
Christmas Cards
If you haven’t started yet. Now is the time. If you finished your Christmas Card List last month then you know how many you need to make. I recommend adding 10% for those you might have missed or those who might enter your life between now and Christmas.
I will continue posting my card ideas all the way through November, but I hope you have some plans already. My Stamp-A-Stack classes have already started. Last weekend one of the cards was a Christmas card and they will continue making some this month too!
Gift Shopping
I know we have already been tracking our ideas but keep on it. This is the biggest area I always struggle with and the more I pay attention to people and what is going on with them, the better my gifts.
Even though my lists say gift shopping, I really don’t start buying until November. I just collect what I want to buy, my ideas. I have several people on my list that might purchase an idea for themselves before Christmas, so I wait a bit to be sure it is safe. (Mom, if you are reading this, I am talking about you). 😉
Now is also the time to see what wrapping materials you have left over from last year. Before I started doing this, it would never fail that I would be in a store with the Christmas stuff that came out early and see a deal on wrapping paper or bags. I would buy them because I thought they were cute just to get home and discover I had 4 rolls of paper that I bought because they were cute in after Christmas sales and forgot. It is always good to have your actual needs on a list for when you do see that must have item. This will keep you buying what you need and not what you don’t need.
Plan Baking
I know we have already started working on our Make Ahead cookies, but here I am talking about everything else. We make 5 different types of cookies each year. We often change up one or two so I will test drive a cookie or two to see if they will taste good or be able to survive a week or so. We tested out a cookie this year that was delicious but learned we had to eat it immediately. The next day they were already too soft and were falling apart.
I will share with you which Cookies we are making this year:
Cutout Sugar Cookies – I will be making these this month. I use Our Best Bites for this recipe too – https://ourbestbites.com/sugar-cookies/ and I use the glace icing of theirs too. It sets up firmly and still tastes amazing!
Baklava Sugar Cookies – This is a new one this year. I will be making this ahead as well. We tested it and was able to make it up completely and freeze it and it still held up well and tasted great when it thawed. This is a little bit more work so I am glad I can do it in advance. https://www.bonappetit.com/recipe/baklava-cookie-recipe
Christmas Kiss Cookies – We usually have a type of kiss cookie. For many years it was the traditional peanut butter kiss cookie, but we started to mix it up. This one is fun; however, uses a LOT of sprinkles! https://www.sprinklebakes.com/2019/12/christmas-kiss-cookies.html
Italian Lemon Drop Cookies – The lemon cookie is a nice refreshing change for the palate. For the icing, we use the Glaze icing from Our Best Bites. We already have it made to decorate the Cutouts, so it made it easier. https://cakescottage.com/2017/11/29/italian-lemon-drop-cookies/
Something you might notice is there are six cookies here and I said we usually make five types. This is part of the planning. We can choose which one we are going to cut so I am seeing if I have enough that I can make ahead so we can do all 6six. 😀
Cookies are not the only baking you should be planning. What baking, if any, are you doing for Halloween? Thanksgiving? Christmas Dinner? If you plan this now, you can see if there is anything that you can do in advance.
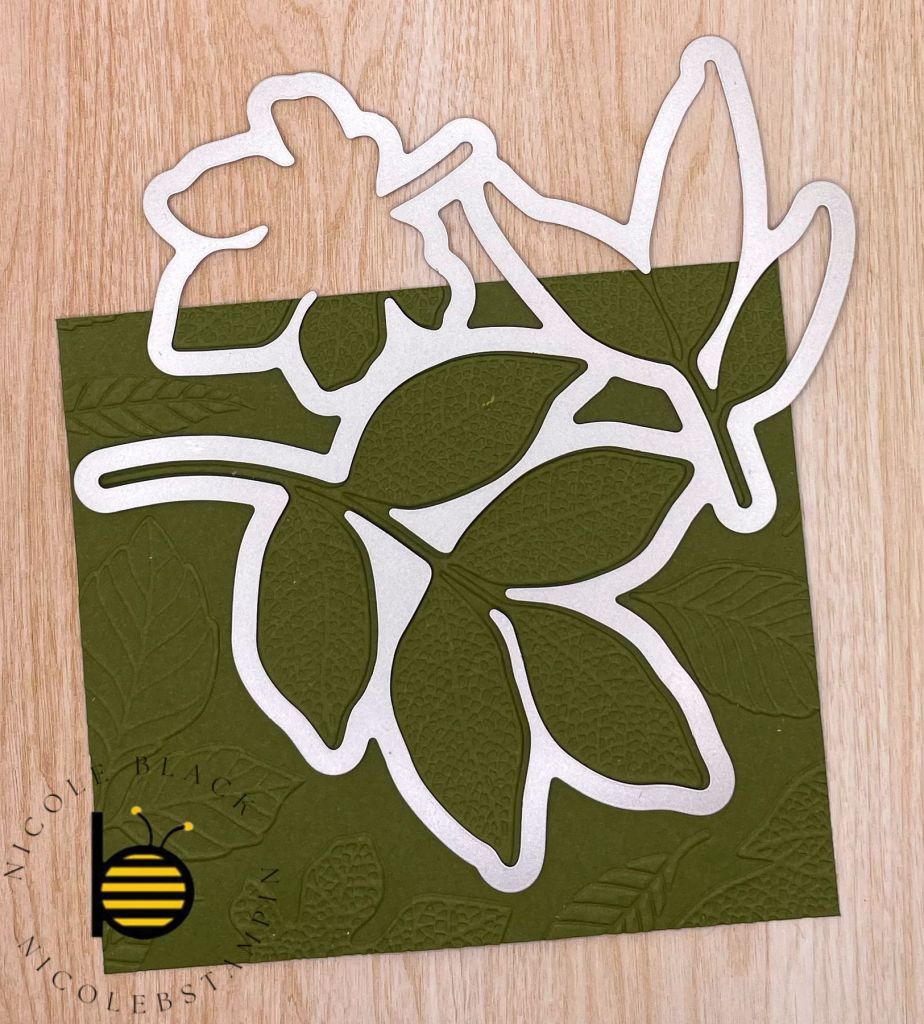
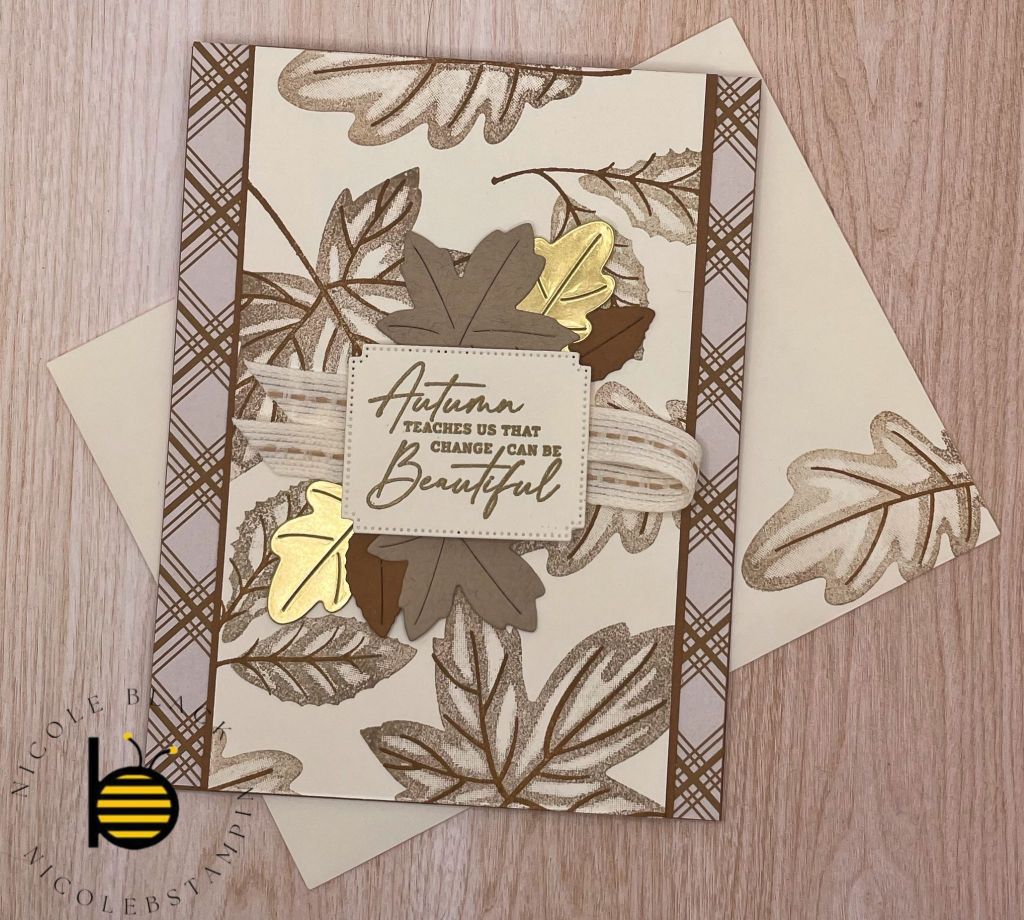
I created a fall birthday card for my September Birthdays. I used the Changing Leaves Bundle. I love how the stamp set, dies, and embossing folder all work together seamlessly! Again, you will see I used the Iconic Celebrations DSP, I just can’t get enough of it!
In this card I have the card base and 3 layers. I liked bringing more colors to the borders; however, it could be done with just the top white layer as well. The top layer is embossed with the Changing Leaves Embossing Folder.
For the Mossy Meadow leaf, I first embossed the cardstock making sure I had the leaf I wanted completed in the image.
I then die cut out the leaf and adhered it to the front of the card with Dimensionals. The saying label is also added to the front of the card with Dimensionals.
I hope I was able to bring you a little fall coolness to your day with my fall birthday card. I would love it if you shared your fall creations!
Cardstock Cuts for this project:
Cajun Craze – 11″ x 4-1/4″ card base scored at 5-1/2″; 5-1/8″ x 3-7/8″ panel
Mossy Meadow – 4-3/4″ x 3-1/4″ Changing Leaves Die
Basic White – 5-1/4″ x 4″ panel (inside card), 5-1/4″ x 4″ panel; 5″ x 3-3/4″ panel embossed
Iconic Celebrations 6″x6″ DSP – 4-1/4″ x 2″ panel
Stampin’ Up! products used to create this project:
As we are starting to get closer to fall, I pulled out the Autumn Leaves bundle to play with. I had a lot of fun stamping my own background! This uses Pecan Pie, Crumb Cake, and Very Vanilla.
My friends are making this card this weekend at my Stamp-A-Stack. If you are local and interested in attending classes, please let me know! You can see my calendar of events here – https://nicolebstampin.stampinup.net/
The background Very Vanilla was stamped with Crumb Cake and Pecan Pie to create the background image. The leaves were die cut and adhered with glue dots. The Label was Gold Embossed and adhered with Dimensionals. I just realized that my photo does not include the embellishments that I added to the card. I love bling so they add a nice extra pop. You will see those in the video.
Please share your fall creations!
Video Demonstration
Cardstock Cuts for this project:
Pecan Pie – 11″ x 4-1/4″ card base scored at 5-1/2″, 5-1/2″ x 3-1/2″, Leaf die cuts
Very Vanilla – 5-1/4″ x 4″ panel (inside card), 5-1/2″ x 3-3/8″ panel, Label die cut
Iconic Celebrations 6″ x 6″ Designer Series Paper – Two 5-1/2″ x 3/4″ panels
Crumb Cake – Leaf die cuts
Golf Foil – Leaf die cuts
Stampin’ Up! products used to create this project:
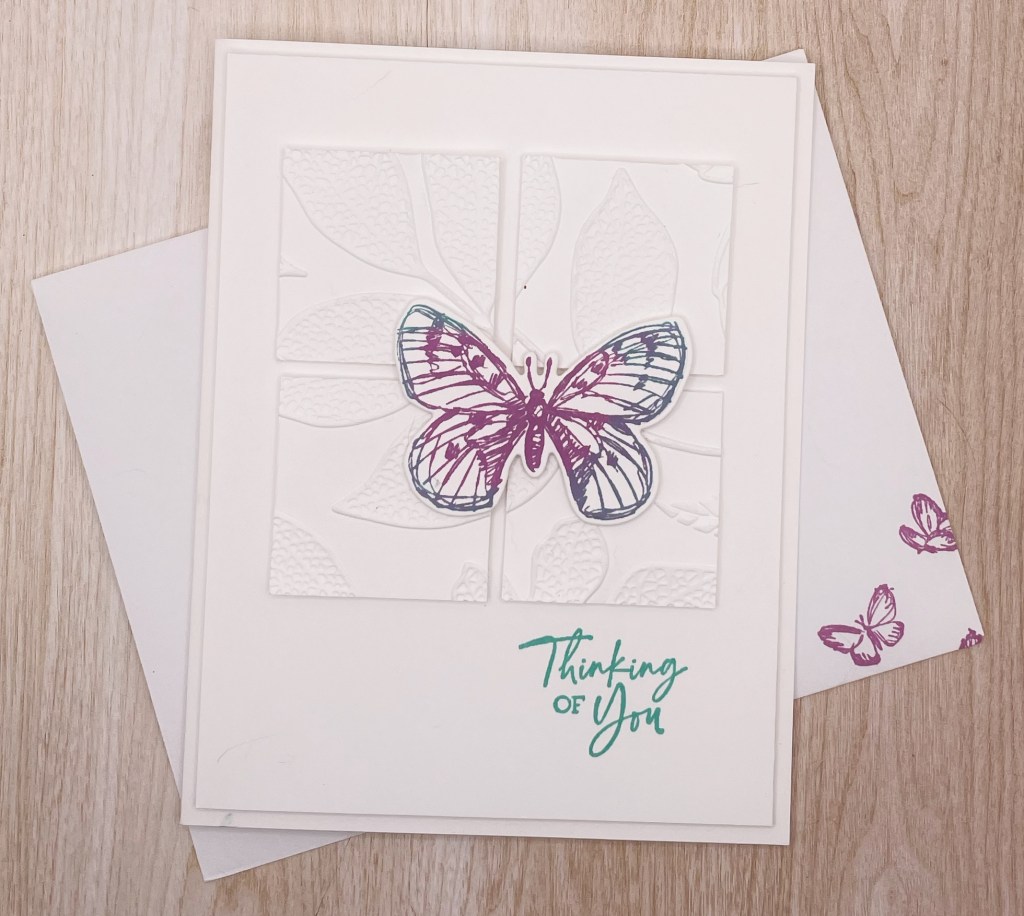
I love Christmas but I do make other cards too. This butterfly card uses one of my favorite techniques, rock-n-roll.
The butterfly is done with the rock-n-roll technique. First stamp in the butterfly in the Petunia Pop. Then roll the the edges of the butterfly in the Summer Splash. When you stamp the image, you will get the two colors, one on the inside and one on the outside.
The background 3″ x 3″, first emboss it with the Changing Leaves Embossing Folder. then cut it into 1-1/2″ squares. This breaks apart the image to create a fun motif!
Cardstock Cuts for this project:
Basic White Thick – 8-1/2″ x 5-1/2″ card base scored at 4-1/4″
Basic White – 5-1/4″ x 4″ panel (inside card), 3″ x 3″, 2-1/2″ x 2″
Stampin’ Up! products used to create this project:
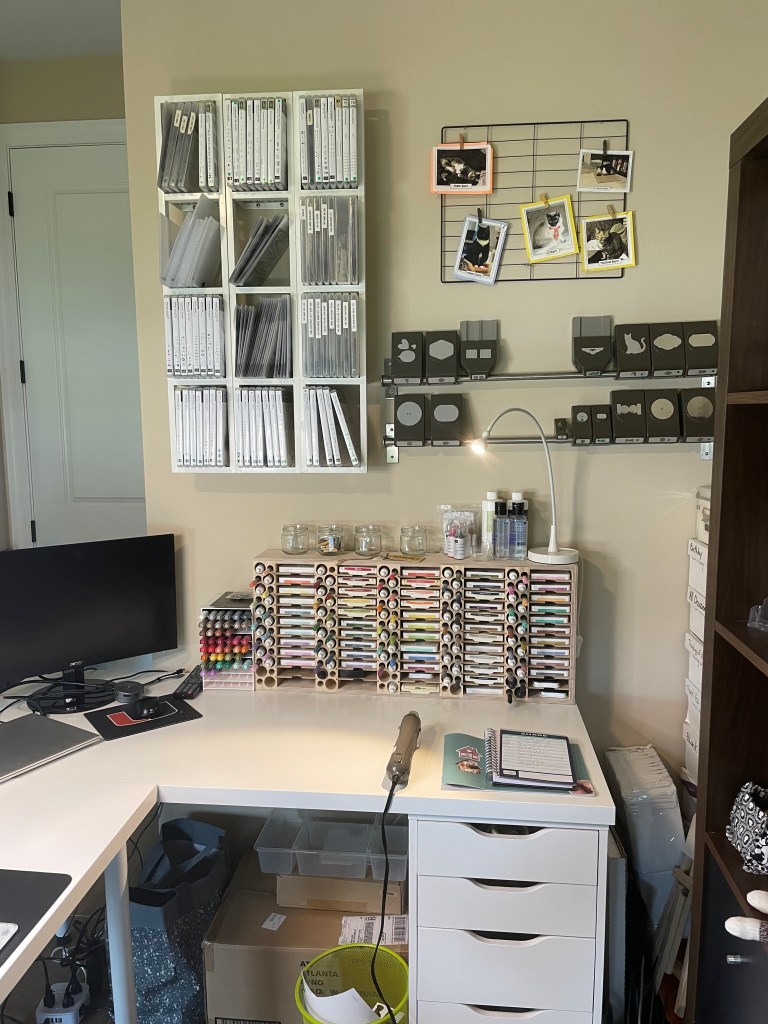
One of the tasks for August is to clean and organize your craft room. I like to “spring clean” my craft room before I dive too deeply into all the different craft projects I like to do for the holiday season. This year I went a bit further. I moved my craft room to the bigger bedroom to be able to make it an office as well. I am in heaven with my new room!
The best organization for craft rooms can be found at IKEA and Stamp-N-Storage.
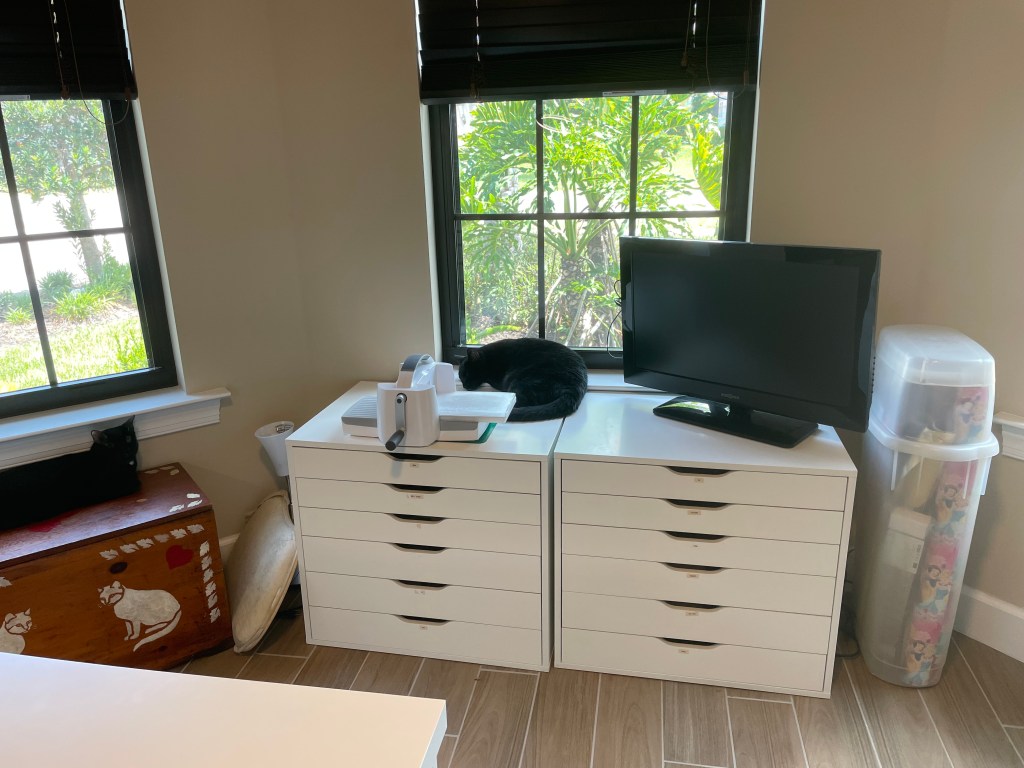
Kallax shelving is great for storage. I added drawers and bins to help with my organization. I also added a cat bed for my babies. The filing cabinet holds all my cardstock. In Florida, you have to protect your papers from the strong sun.
Meet Little. One of my beautiful babies that things my photo cube is a bed for her. Notice she is NOT using the cat bed I put in.
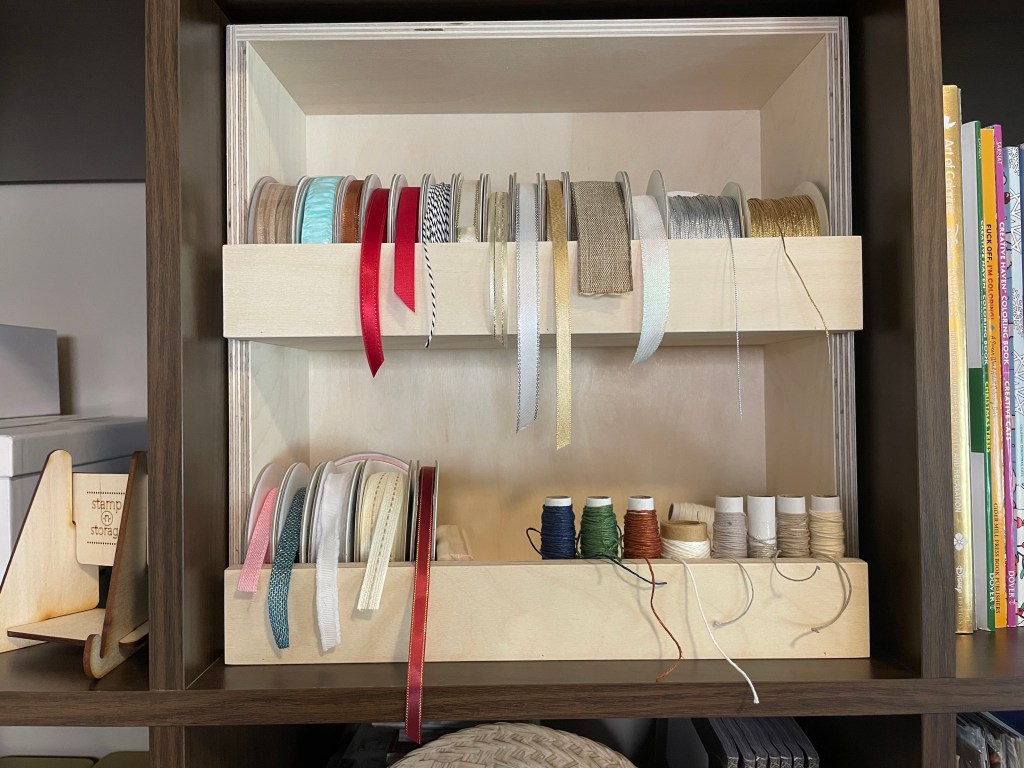
Stamp-N-Storage has pieces that fit in the IKEA Kallax Shelves. I love the ribbon holder!
The tables and drawers are IKEA as well. I love all the table space I now have. I even have room for someone to stamp with me. You can see that I have my computer set up too. I no longer have to share the office with my husband!
DVD holders are great for storing stamp sets and dies. I use the kitchen bars from IKEA to hold my punches. I have my Stampin’ Blends in Stampin’ Up! storage and the ink, markers, and re-inkers in the Stamp-N-Storage holder.
There is the tour of my craft room! As a project manager and crafter, I LOVE all the organization! So, I give you the challenge. Get your craft rooms ready for all our holiday crafting!
I love to bake. When I was a kid, I used to do a marathon baking weekend where I would make dozens and dozens of cookies in one weekend. My parents would pay for the ingredients, and I would bake. Then they could be used as gifts, taken to parties, or just enjoyed by us.
With age, the marathon baking weekend became more and more exhausting, so I started looking for shortcuts. There are many recipes out there that can be made ahead at different stages and then frozen for up to 6 months.
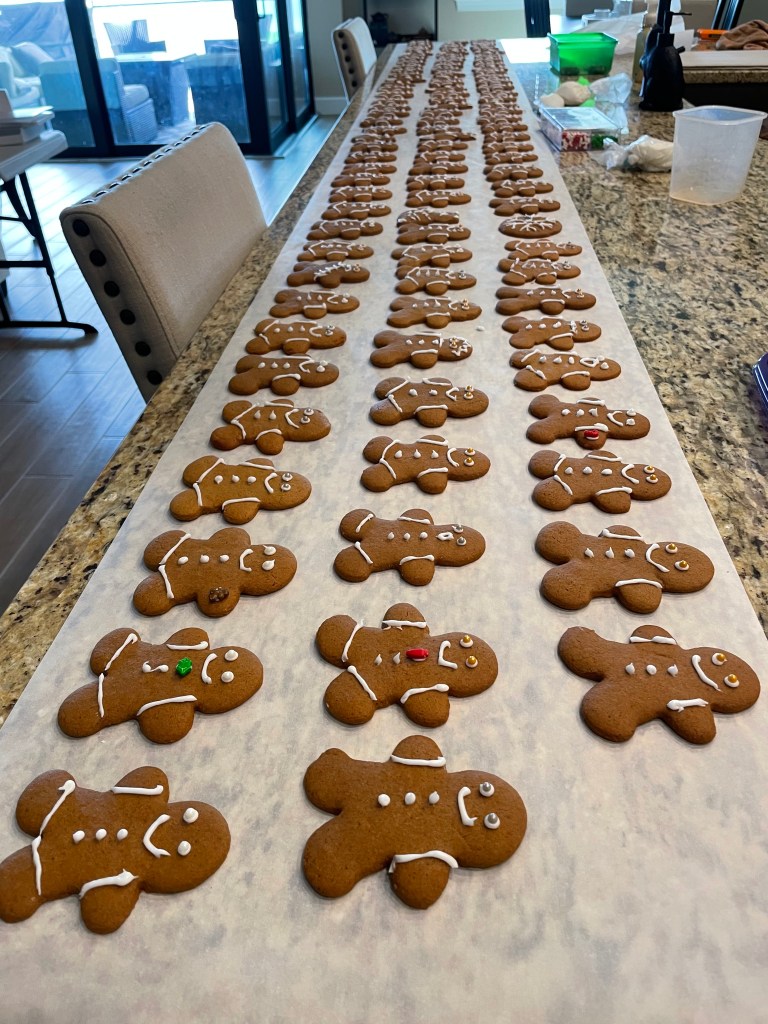
Full disclosure, I made my August Make Ahead Cookies in July. Mostly because watching Christmas movies made me want some 😀
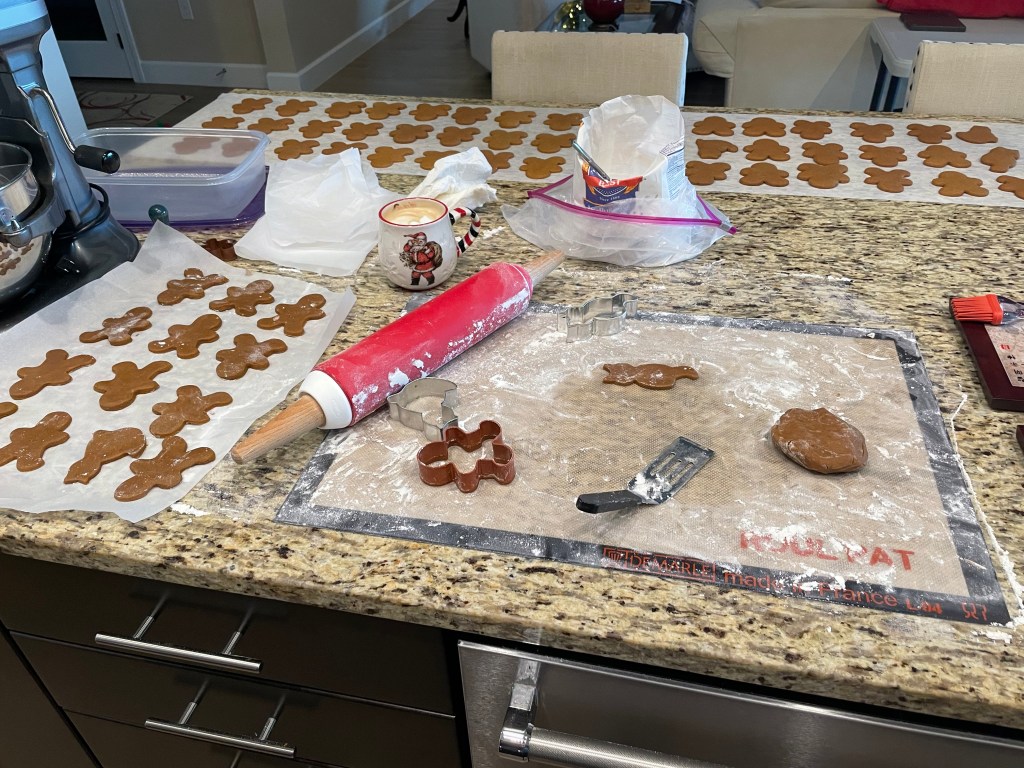
These Gingerbread cookies are my favorite. I prefer soft and chewy Gingerbread and not the crispy Ginger Snaps. If you are like me, I highly recommend this recipe from Our Best Bites. https://ourbestbites.com/gingerbread-cookies/
My husband and I made and decorated 120 Gingerbread cookies. 100 of them went into the freezer and the other 20 were enjoyed immediately. I decorated these before freezing. Icing will go from glossy looking to matte when frozen but with these guys, I don’t mind the matte look. So, in December all I need to do is remove them from the freezer and put them on the plates!
I hope you take my advice and start your baking. Post what you decide to make and share recipes and pictures! Know that sometimes recipes will have you freeze once the dough is made and some before decorating so be sure to pay attention to this.
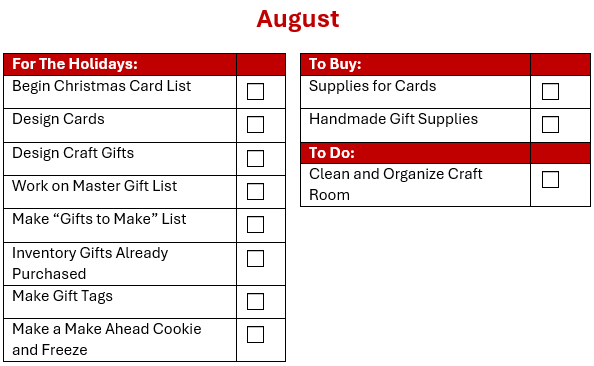
In August, it is all about planning your craft projects. As you have seen in a previous post, I have already begun designing my Christmas cards. I will finalize all my designs this month but will post them over time for you to see. I will also share my craft gifts that I am making.
Christmas Card List
This is another document I created once and then just keep up to date. I created an excel spreadsheet with each person I want to send a Christmas Card to along with their mailing address. I send to around 200 people so I group them into categories also so I can filter by these categories when I review the information each year.
If you have not picked up on it by now, I am a very organized person. As a Project Manager, I track all aspects of a project and this project is no different. In my spreadsheet, I also track which card design I send each person. I shared that I create many different designs each year and I love nothing more than sending a different card to people that might see someone else’s card. I assign out the designs and track them year to year. This way, if I have leftovers from one year, I can make sure not to duplicate the design to someone the next year. I know, this might be taking it too far. You can feel free to disregard this section if you wish 😉
Gift Giving
Spend August continuing to develop gift ideas for your list. I don’t necessarily start buying gifts, unless it is something I see that I will not be able to get later (I love gift shopping when I travel). But every time I have an idea I record it, because I KNOW I will not remember it later.
I also make sure to inventory what I might have already purchased (remember the trips in the first half of the year?), I add these items to my master gift list. I try to keep gifts I buy early in the same location. This is a lesson learned when I “lost” gifts and was not able to find them until after Christmas 😦
The Full Checklist
If you are anything like me, you are frustrated right now because I am only sharing the tasks for the month, and you want to look ahead and customize it in advance, so you are ready. I get it. So here is my full project plan for Christmas.
There are items on here that may not pertain to you and there are probably tasks missing. Remember I am in Florida so there are no tasks for building a snowman, snowball fights, and snow angels. Though I miss those items I would prefer to be warm and not have the tasks of shoveling the driveway and hanging lights in the cold. I do really miss being able to cuddle up in front of the fireplace with a cup of hot cocoa but wait until you see what I do!
Throughout this Christmas planning, I would LOVE to hear all about your traditions and the tasks you add or change to prepare. I hope I can learn from you as well! So please comment and share! I would also LOVE to see pictures of your creations 🙂
I am a project manager by day and a crafter by night. I love Christmas and want to do it all every year. I will share with you how I do it and enjoy it too!